One-stop Bending Solutions For Wires, Tubes And Pipes
One-stop Bending Solutions For Wires, Tubes And Pipes
Wire bending machine user guide
1. Inspection before wire bending machine operation
1.1 Whether the machine’s movable parts such as sliders and back gauges are parked at the position where they were parked last time;
1.2 Whether the limit switches and travel switches of the machine are loose and in normal condition;
1.3 Whether the appearance of the power switch, emergency stop button and various operating parts of the machine’s electrical system is intact;
1.4 Whether the appearance of the exposed wire conduit grounding protection wire and other wires of the electrical system is intact;
1.5 Whether there is oil leakage in the exposed parts such as hydraulic and lubricating pipe joints; Whether the pressure gauge of the system is intact;
1.6 Whether the safety protection devices of the machine such as protective covers are intact;
1.7 Whether the various operating and adjustment handwheels and handles of the machine are intact;
1.8 Check whether the bolts, screws, nuts, fixing pins and other fasteners that should be tightened in various parts of the machine are loose; (pay attention to distinguish between fasteners and screws for adjustment, etc.)
1.9 If problems are found, deal with them in time, and if problems that cannot be dealt with, notify the relevant personnel in time.
2. Work preparation
2.1 Strictly abide by the safety operating procedures and wear labor protection equipment as required;
2.2 Check whether the lubricating parts of the machine need lubrication. If necessary, add lubricating oil (grease) according to the requirements of the lubrication part of the manual;
2.3 Check whether there are other people or debris that may hinder the operation of the parts, such as tools, waste materials, etc., within the travel range of each motorized part. If there are, they must be removed;
2.4 Confirm whether the machine’s working capacity, mold size, etc. are suitable for the workpiece being processed;
2.5 Start the motor oil pump and listen for any abnormal sounds. After the equipment is started, run it idle for 1 to 2 minutes, and move the upper slide at full stroke 2 to 3 times. If abnormal sounds or faults are found, stop the machine immediately, eliminate the fault, and work can only be carried out after everything is normal.
3. Precautions during operation
3.1 During operation, the workpiece to be pressed should be placed between the upper and lower molds and parallel to them, and placed steadily. During the operation of the bending machine, it is forbidden to inspect or adjust the mold;
3.2 When bending a large workpiece over 1.5 meters long, two people (or more) are required to operate to avoid the workpiece from tipping over when the pressure is released due to deformation of the workpiece under force. It is not allowed to hold the pressed workpiece at close range;
3.3 When bending, the operator is prohibited from putting his hands between the production molds. It is forbidden to hold narrow, long and small materials directly with hands. Pliers can be used to assist in operation;
3.4 Only one piece of material is allowed to be bent at a time, and multiple pieces of material are not allowed to be bent in sections at the same time;
3.5 When the machine tool is working, no one is allowed to stand behind the machine tool;
3.6 When the mold is found to be incorrect during operation, it should be stopped for correction. It is strictly forbidden to correct it by hand during operation to prevent injury to the hand.
4. Precautions after work
4.1 Before shutting down, place wooden blocks symmetrically between the upper and lower molds under the oil cylinders on both sides or lower the upper mold to the bottom of the lower mold opening;
4.2 It is strictly forbidden to adjust the regulating valve and pressure gauge randomly. If adjustment is required, it must be carried out under professional guidance;
4.3 When adjusting the mold or overhauling, the power must be turned off to ensure safety;
4.4 After work, wipe the machine tool, clean the surrounding work area, and place the workpiece in the designated position.
5. Operation steps of wire bending machine
5.1 Power-on button sequence
①Turn the key switch of the electric control box clockwise;
②Press the white power switch of the electric control box (the white switch is on);
③Press the green start button (the green start button is on);
④Press the start button with a green circle on the front panel;
⑤Step on the left pedal of the foot switch “up” to lift the upper die (the longer you step on it, the higher it will be);
⑥Put the bending part into the bending groove of the bending lower die;
⑦Start bending (set parameters according to the sheet bending pressure gauge)
5.2 Bending, taking out and cleaning
①Step on the right pedal of the foot switch “down” to drop the upper die for bending;
②Step on the left pedal of the foot switch “up” again to lift the upper die and take out the workpiece;
③Press the red button to stop the operation and press the green start button to continue the operation;
④After the work is completed, turn off the switch button of the electric control box, and then turn the key switch counterclockwise to “0” to cut off the power;
⑤Clean the equipment.
5.3 Emergency response equipment
If there is an emergency or sudden incident such as abnormal noise, jamming, or smoke during operation, the emergency stop switch should be pressed immediately to stop the equipment (the operating lever, control panel, and electric control box each have an emergency stop switch, which should be closed according to the principle of proximity), and all equipment switches should be turned off, and the equipment management personnel should be notified in time; if an injury occurs, the power supply should be cut off immediately after the emergency stop switch is turned off, the scene should be maintained, and the leader should be notified.
6. Maintenance and care of wire bending machine
6.1 Lubrication of machinery Lubricate the back gauge, main rail, mechanical stop iron adjustment device, torque shaft and other parts as required. The lubricant uses N46 industrial lubricant, No. 2 calcium-based or lithium-based grease, as shown in Figure 8 (Lubrication parts of the machinery).
Back gauge: linear guide rail (2 places), lead screw (2 places), require grease injection with oil gun once per shift; bearing (4 places) grease injection once every 6 months;
Main rail uses rectangular guide rail (2 places), lubricated 1-2 times a week.
Mechanical stop block adjustment device: worm reducer lubricant replacement once every 12 months; stop iron limit screw lubricated once every 6 months, bearing (4 places) grease injection once every 6 months.
Torque shaft: 4 places of the middle connecting plate rotating shaft, 2 places of the two end shafts, grease injection once per shift.
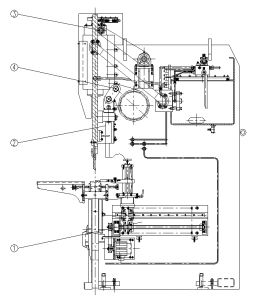
① Material stopper (8 locations) ② Main guide rail (2 locations) ③ Mechanical stopper adjustment device guide rail (7 locations) ④ Torque shaft (6 locations)
Note: When lubricating the above lubrication points, the machine must be stopped!
7. Maintenance and care of hydraulic system
7.1 Replacement of hydraulic oil Regularly check the cleanliness and deterioration of the oil.
The cleanliness of the oil should be checked once a quarter. If the oil is turbid, floccules are produced, discolored, or odorous, the vehicle should be stopped immediately and the oil should be replaced. The sampled oil is obtained from the drain valve. The water should be drained before sampling. The discarded hydraulic oil should be properly handled to avoid polluting the environment. Under normal circumstances, the hydraulic oil should be replaced within half a year after the machine tool is put into use. It must be filtered once a year thereafter. In principle, the service life of the hydraulic oil should not exceed 18 months. The oil must be replaced all at once, and there must be no residual oil in the oil tank. The oil tank must be carefully cleaned before refueling. When any components related to the hydraulic system are removed and reinstalled, the connection position must be cleaned. It is recommended to use anti-wear hydraulic oil N32~N46 for oil replacement, and the oil consumption is about 500 liters.
The specific requirements for oil change are as follows:
1. The oil tank must be strictly cleaned before refueling. It is strictly forbidden to use cotton yarn or cotton cloth for cleaning. It is recommended to use silk cloth or edible flour balls.
2. When refueling, you must use a refueling truck with a filter of less than 5μ, and refuel through the air filter filling port on the fuel tank cover (unscrew the filter cover by hand).
3. When refueling, pay attention to the height of the oil tank liquid level should be in the middle and upper position of the liquid level gauge, but not lower than or higher than the indication range of the liquid level gauge. During the debugging process, pay attention to observe the changes in the oil level height. Once it is lower than the lowest position of the liquid level gauge, you must stop and refill the hydraulic oil.
7.2 Strictly control the oil temperature
When the oil temperature is lower than 10℃, heating measures or idling cycle should be taken. When the oil temperature exceeds 60℃, cooling measures or shutdown should be taken to cool down.
7.3 Regularly check the leakage of valves, valve plates and pipelines, and replace the sealing rings in time.
7.4 When the oil tank needs to be drained when the oil pump is repaired, open the stop valve at the bottom of the oil tank to drain the oil. When checking the cleanliness of the oil regularly, drain the water in the oil tank from the valve.
If you need to know more or have product needs for a pipe bending machine, please contact us bender@antishicnc.com and a professional will answer your questions.
More previous articles:
How to Select the Right Rounding Machine?
What you need to know about pipe bending machines
Key words: Wire bending machine、Wire Bender Machine、Tube bending machine
Our equipment has CE, ISO quality inspection certificate, so the quality is guaranteed to be cost-effective. According to different processing requirements, machines can be customized to fit for your usage, to provide customized services. In the processing period, we strictly control the production process, to ensure the quality of clearance, standardize the process, strict implementation.
